
Привет всем, девочки!

I have to say it's exactly the type of project which I didn't plan beforehand - I had printed wedding photos of my best colleague for another piece entirely. But when my eyes fell on this wonderful photo of a bride, and then on my Lindy's collection of greys and blues, I put aside everything I had prepared the day before;)


I wanted to imitate a concrete wall, so I mixed a modelling white paste
with a quartz sand.


I began spraying with a soft color, Silent Night Silver Starburst. I didn't
wait for the paste to become dry for two reasons - have no patience to wait :)
and love how color mixed with a wet paste absorbing into the porous surface.


After that, I dried a bit of the surface with the embossing dryer and added
darker more intense colors - Danny Zuko's Denim Flat Fabio and Midnight
Rendezvous Raven Starburst.
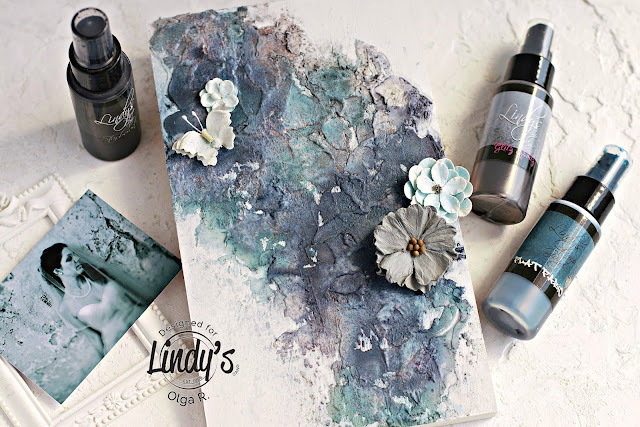

Then I took a dry sponge with a very small amount of white gesso and went
over all the surface to emphasize the texture on the one side and to create an
effect of the 'worn' wall on the other side.


I covered the chipboard pieces with pale shades of blue and white to
achieve a nice contrast to the background.


Для моего ежемесячного поста в Lindy's я сделала проект, который посвящен, наверное, одному из самых трепетных дней в жизни девушки, женщины - свадьбе и церемонии бракосочетания.
Бывают у вас проекты, которые совсем не планируешь, и которые случаются внезапно? Вот эта моя работа как раз из их числа. Я планировала совсем другое, заранее с вечера приготовила материалы в абсолютно другой цветовой гамме. Но, у меня на столе, совсем для другого проекта, лежали свежераспечатанные свадебные фотографии моей замечательной коллеги, и взгляд упал на это фото... Я уже давно поняла для себя, что больше всего меня вдохновляют фотографии и палитры. Вот и на этот раз - у меня замерло сердце, зацепило, а это первый признак, что нужно всё, заранее приготовленное убрать, и достать мою шикарную коллекцию Линдисов в голубо-серых тонах)
Ниже дублирую мой пост и МК из Lindy's, по фото, мне кажется, все понятно и без текста, но если вдруг возникнут вопросы - рада буду ответить!
Copying my blogpost and step-by-step tutorial from Lindy's blog.
Hi gorgeous Lindy's friends!
It's Olga Ravenskaya here and I'd like to share my new project created on a
wooden panel, reflecting one of the most wonderful moments in a life - the
wedding day!

I have to say it's exactly the type of project which I didn't plan beforehand - I had printed wedding photos of my best colleague for another piece entirely. But when my eyes fell on this wonderful photo of a bride, and then on my Lindy's collection of greys and blues, I put aside everything I had prepared the day before;)
So I picked the new materials I'd like to use, you can see them on the
photo below, and began working...
I'd like to show you today how I created the background for this project.

First, I covered a wooden panel, a frame and all chipboard pieces all with
white gesso.


Then I applied this mixture roughly with a wide spatula as shown on the
photo below.


Then I added a little Whale Watch Blue Starburst. It's really is one of my
favorite sprays - not grey, not blue, so very beautiful and sophisticated
color! One love!


I checked with my photo before adding each color, so next step I added
Steel Shimmer Glitz Spritz. It has a ravishing dark, pewter shimmer, and
matched with the previous intense color layers it makes the surface softer.


After that, I added Graphite texture paste through stencils.

I didn't like obvious outlines of numbers, shapes or figures, so I wanted
to blur them by ading color. I added splashes of Danny Zuko's Denim and Steel
Shimmer sprays over wet paste, see the result below - looks worn too!

To finish the background, I stamped a bit with butterfly and crackle effect
images.


Have a look at this great effect of pale and dark!

The background is ready now, only one note left - after all the elements
were arranged I added splashes with white gesso and TiffanyLou Blue Starburst.
And several photos of the finished project...


Lindy's Products
- Starbursts: Silent Night Silver, Midnight Rendezvous Raven, Whale Watch Blue
- Flat Fabio: Danny Zuko's Denim
- Glitz Spritz: Steel Shimmer
- EPs: C'est la vie Cerise, Tilt-a-Wheel Teal, Silver Moon Mistletoe, Purely White
Other products
- Ranger Texture Paste, quartz sand, Finnabair Graphite texture paste, Scrapiniec chipboard, Finnabair and Tim Holtz stencils, 49 and Market and Kaiser Kraft stamps, 49 and Market flowers, mini prills.
Hope you've enjoyed this post and found something useful for you!
Thank you for stopping by!
Hugs,
Olga
Надеюсь, вам понравилось, буду рада, если что-то из МК окажется полезным!
It's my entry into gorgeous August Play - Be Authentic at Art PlayGround blog with such an amazing color scheme

На этом прощаюсь с вами сегодня, друзья!
Пишите, буду очень рада!
Обнимаю,
Оля
Прекрасно!
ОтветитьУдалитьСпасибо большое!!
УдалитьВолшебно! МК потрясающий, очень мне нравятся твои мк, на них всегда все так гармонично и легко, это очень вдохновляет!
ОтветитьУдалитьДаш, ну просто бальзам на душу! Спасибо тебе большое! Ты как никто представляешь, сколько времени и труда за 15 фотками МК)) Так что я очень-очень рада, что нравятся!
УдалитьОлечка, холст обалденный и МК очень понравился!! Столько деталей, все продумано до мелочей! Супер!))
ОтветитьУдалитьГаля, ну как же я рада тебя видеть!!! Так хорошо, что ты опять на связи!)) И спасибо тебе большое!!!
УдалитьSuch a beautiful mixed media canvas !I Love it !! Thank you so much for joining us at ArtPG !! xoxo Heike
ОтветитьУдалитьThank you so much!!! So glad you loved it!!
Удалитьwow! absolutely gorgeous :) love it to bits!
ОтветитьУдалитьThanks for joining the Art Playground Blog's August Play
Preeti
xoxo
Thank you so much dearest!!! Happy to read your words!!:)
УдалитьОля, Крутой холст и спасибо за мк!)
ОтветитьУдалитьСпасибо также от блога Art Playground за участие в задании!
Спасибо большое, Даш!:)
Удалить